In this tutorial, you will create your first Hatch game, and learn a few fundamental concepts along the way.
As of writing, there is no official installer for Hatch, but you can compile it yourself. The readme contains instructions for supported platforms.
For this tutorial, you will need a build with DEVELOPER_MODE enabled, or a debug build.
The Hatch Scripting Language is an object-oriented programming language created for use in Hatch. It emphasizes the use of classes to code entities, and provides facilities found in other programming languages you may already be familiar with. Features of HSL include:
Most of your Hatch scripts will be the definition of one or more classes. Entities are defined by their classes, and spawning an entity is merely the same as instantiating a class. Let's create our first script, an entity that displays something to the screen and can be moved around.
Before doing anything, we need to setup our project's folders. Go to the root of your project, and create a folder named Resources in it. Inside of that folder, create an Objects folder. Hatch uses a bytecode virtual machine to execute HSL code, so it needs to compile script files before executing them. This folder is where Hatch will output the compiled scripts to.
Now, go back to the root of your project, and create a Scripts folder. Inside of it, create a file named init.hsl. Your folders should be looking similar to this arrangement:
init.hsl is the entry point of a Hatch game. This script is executed once, when the game starts, before any scene is loaded. In any script file, the top-level code is executed whenever said script is loaded. When the script belonging to a specific class has not yet been loaded, the top-level code of that script is ran before the instance is created. This is how code written for an instance gets 'bound' to it: running top-level code defines a class, and the functions of that class are later called by the engine.
In your text editor, add the following to your new init.hsl file:
Here, we are defining a class for Square with nothing in it, and creating a new instance of it. The new keyword is used to create an instance of a given class. To make it do something, though, we need to give it events. Those are functions or methods called by Hatch, the instance itself, or some other code. Let's make our Square print something to the log file whenever it's instanced:
The event keyword defines an event called Square. Any event whose name matches the name of its class is its constructor. This will be called whenever an instance of Square is created. Inside that event, the print keyword is used to print the string "Hello, world!".
Now, run Hatch. Since we don't have anything other than our Square, you will see a black screen, although there is text being printed to the log file. If you don't know where that is located, navigate to USERPROFILE%\AppData\Local\hatch\ on Windows, or $HOME/.local/state/hatch/ on Linux. ($XDG_STATE_HOME/hatch/ is also a valid path.) You'll see a HatchGameEngine.log file. When you open it, this will be its last line:
Success! We defined our first class, and made Hatch execute its code. If you look in the Resources/Objects/ directory, you'll notice the following files were created:
Hatch needs to compile your HSL scripts into bytecode before being able to execute them. The FDD03353.ibc file is the compiled bytecode for the init.hsl script, and Objects.hcm contains a list of the compiled bytecode. This means you never have to distribute your game with your source scripts, and loading the compiled instructions is more efficient than compiling scripts on the spot. As you create more scripts, Hatch will keep compiling HSL into bytecode.
The Game Configuration File, or GameConfig.xml, is loaded from the Resources/ folder before any scripts are ran. It contains information about your game, such as its name, version, and developer; and engine configurations like the base screen size, or the framerate. The Game Configuration Page in the Manual has a complete list of what can be changed in GameConfig.xml. Let's create a basic GameConfig that just changes the game's title.
In your Resources/ directory, create a file named GameConfig.xml. Your folders should be looking similar to this arrangement:
Open GameConfig.xml in your text editor, and copy this text into it:
Save the file, and reopen Hatch. The title of your window will change to match the name of the game:
This will also change the location of your log file. To find it, navigate to USERPROFILE%\AppData\Local\My Hatch Game\ on Windows, or either $HOME/.local/state/My Hatch Game/ or $XDG_STATE_HOME/My Hatch Game/ on Linux.
Since we are planning to display something to the screen, an instance won't be enough. As mentioned in the Introduction chapter, a scene is compromised of entities, and an entity is merely an instance managed by a scene. The scene knows that it should execute the code of an entity, which includes rendering it. This is possible because there are specific methods the engine looks for in a class, and calls them. In our case, we need to write a Render method. We will also learn what other methods Hatch calls during the scene lifecycle.
Let's go back to our init.hsl script. Replace new Square(); with this:
Then press F1. When developer mode is enabled, the F1 key recompiles your code and restarts the game, without needing to close and reopen Hatch. The exact key this is bound to can be changed in the GameConfig or the settings file.
You should see the same message as before in your log file. We can now make the Square show something to the screen! Remove the code inside event Square, so that it no longer prints our message:
And now, we're going to create a Render event. Below the block of the event we already have (not inside), add this piece of code:
Your script should be looking like this:
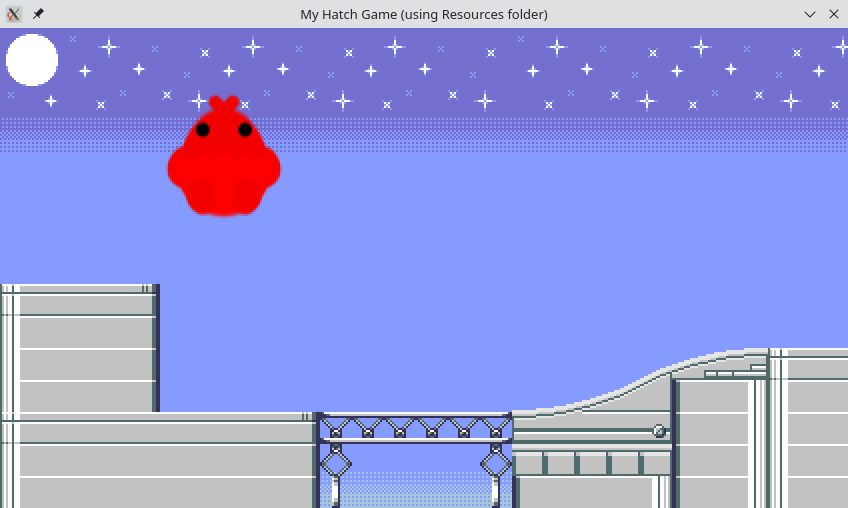
Recompile your code by pressing F1. You should see this:
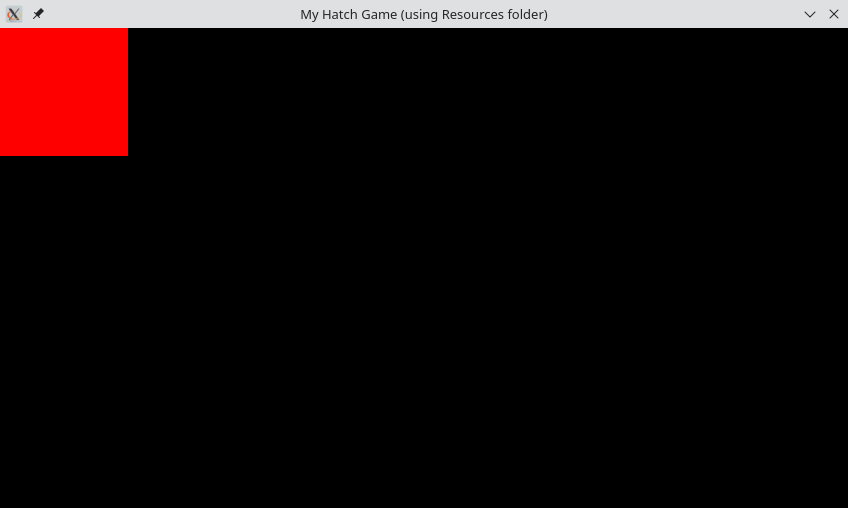
The Draw.SetBlendColor method sets the current color used for drawing. We passed (1.0, 0.0, 0.0, 1.0), so the current color is now a solid red.
Draw.SetBlendColor also supports a different way of calling it, where you instead pass an integer representing an RGB color, plus a decimal representing the alpha value:
Next, we called Draw.Rectangle using this.X and this.Y as the first two arguments. this refers to the instance of the Square, and X and Y are the coordinates of the Square entity. Remember what you wrote in init.hsl? This line:
The second and third parameters are the X of Y position of where to spawn the entity. Since both are 0.0, this places the entity on the top left corner of the scene. Finally, the last two parameters passed to Draw.Rectangle are the width and height of the rectangle.
Let's change the position of the square. Change the second and third arguments passed to Instance.Create, like so:
Press F1, and you should see this:
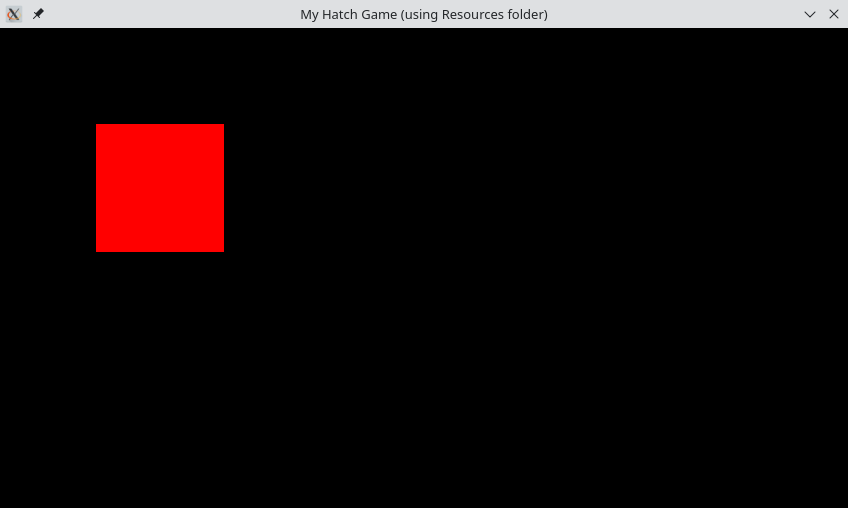
The square is no longer at the very corner of the screen, since we changed its position on the scene.
Like all object-oriented programming languages, any instance will have fields you can set and get. When you spawn an entity, Hatch will provide to the instance built-in fields like X and Y, but we can also make up our own. Let's make it so that we can manipulate the color of the square using fields.
This is also a good time to mention that Hatch calls the Create method on any new entity. When it was a plain instance, we used the constructor, but with entities, Hatch calls both the constructor and Create. The difference is that the constructor is ran before Create, though currently this is not relevant. Either way, let's rename our event Square() so that it's a Create instead.
Now, we'll initialize four different variables for each argument that will be passed to Draw.Rectangle:
Here they are named RedColor, GreenColor, BlueColor, and AlphaColor for general consistency with HSL's style, but you can give them other names, of course. The next step is to change the Draw.SetBlendColor call to use the variables we defined.
Press F1. It should look the exact same, but we'll add code to make the player able to manipulate its color.
Giving control to the player is necessary in any game, and Hatch listens to various types of devices for input. Generally, you do this through certain methods in the Input class. You could manually check if a given keyboard key or controller button is being pressed, or if a controller axis is being moved in a given direction, but Hatch already has a system to handle all of this in place. Those are called input actions. If that sounds familiar to you, Godot and Unity have a similar system with the exact name, and they have the same goal. Input actions abstract what the player actually does (press a key, move an analog stick, scroll the mouse wheel) into some kind of game-specific action, like move a character, or navigate through a menu.
You can define your game's set of input actions using GameConfig, but since version 1.4, Hatch provides a set of default input actions:
| Action | Keyboard key | Controller button | Controller axis |
|---|---|---|---|
| Up | Up arrow | D-Pad up | Left stick up |
| Down | Down arrow | D-Pad down | Left stick down |
| Left | Left arrow | D-Pad left | Left stick left |
| Right | Right arrow | D-Pad right | Left stick right |
| A | A | Bottom face button | |
| B | S | Right face button | |
| C | D | Left shoulder | |
| X | Q | Left face button | |
| Y | W | Top face button | |
| Z | E | Right shoulder | |
| Start | Enter (Return) | Start | |
| Select | Tab | Back (or Select) |
All actions have binds for both keyboard and controller, so if you have a controller plugged in, you'll be able to use it here.
Generally, you'll be using the following methods to check for input: Input.IsActionHeld, Input.IsActionPressed, and Input.IsActionReleased. Let's do something basic and write some code that changes the color of the square whenever the player presses (not holds) left or right.
Add an Update method to the class. Update is usually called for all entities on the scene, each frame. Inside it, we'll check for player input:
The first parameter is the player index to check. This is zero-based. There is only one player, so we pass 0. You may use Input.IsActionPressedByAny to check if any player is pressing a specific action. The second parameter is the name of the input action to check. In this case, Right. If the first player is pressing right on their keyboard or controller, this call returns true.
Now let's make it so that pressing right gradually changes the color of the square from red to blue.
If you recompile your code, then press right enough times, the square should be blue.
To turn the square red, we do the opposite of the above code snippet, and check if Left is being pressed instead.
Recompile your code, and try pressing right and left. You'll be able to change the color of the square to blue or red.
Now that you know the basics of input actions, we can do a little more with this square, such as allowing the player to move it around. Hatch's coordinate system places (0, 0) at the top left corner of the scene, with X increasing moving to the right, and Y moving down. In Update, we add code to check if Up, Down, Left or Right are being held, and if so, we increment or decrement X and Y by a certain amount. For now, let's change Left and Right in the code that changes the square's color to refer to different input actions, like A and B.
If you recompile your code and press the arrow keys (or the D-Pad in your controller) you will be able to move the square around.
Note that Hatch has no way of knowing those are directional inputs, so the player will be able to hold opposite cardinal directions. You'll want to handle that in an actual game.
All resources in Hatch are loaded through a Virtual File System. Since we created a Resources/ directory earlier, Hatch mounts this to an internal VFS, and all resources are loaded from that folder. When it's time for you to package your game for distribution, you'll be given options to pack your resources into a single file, and Hatch supports different formats for resource packing, including its own. The manual provides more details about this functionality.
To load resources like sprites, images and audio, we use the Resources class in the standard library. For image files, the Resources.LoadImage function can open a PNG or GIF file and return an image we can draw. This is the image we'll be using:

Save this image into the Resources/ directory. Your folder structure should be looking similar to this:
Since this won't be a square anymore, let's rename the class to something else:
Now, let's load the image using Resources.LoadImage as previously mentioned:
The second argument passed to the function is the resource's unload policy. A value of SCOPE_SCENE means the resource will only stay loaded for the lifecycle of the current scene, and a value of SCOPE_GAME keeps the resource loaded for the entire game. Which unload policy to use will depend on how often you will need a given asset.
The Draw.Image function can be used to draw an image to the screen. It accepts an image resource and X and Y coordinates as parameters. In Render, replace the line that draws a rectangle with a call to Draw.Image like so:
Lastly, change the Instance.Create call to refer to Chick, not Square.
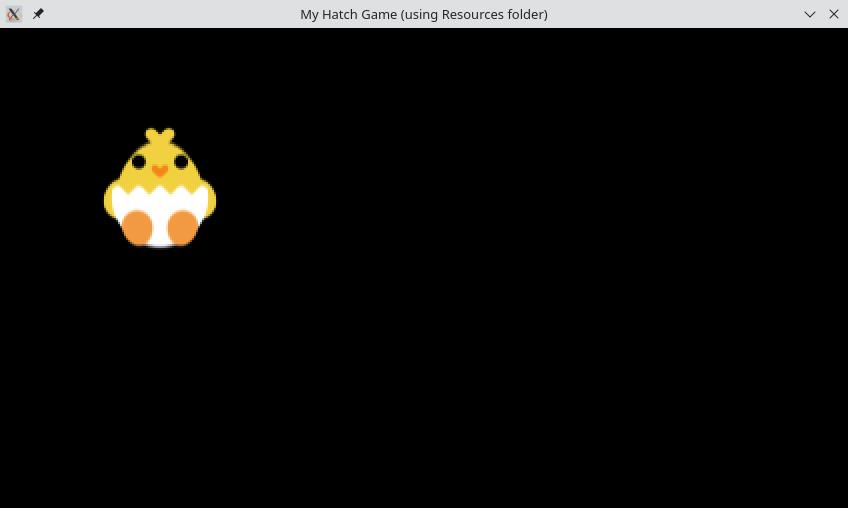
Press F1. You should see the Hatch logo on the screen instead of a red square.
Even though our Render function still has a call to Draw.SetBlendColor, the Hatch logo is being drawn in its usual colors, instead of being tinted red or blue. The reason is that, normally, bitmaps drawn to the screen (such as images and sprites) aren't blended with the current color, and you have to tell Hatch to do so. This is possible through calling Draw.SetTextureBlend.
Now if you recompile your code, the Hatch logo will be blended either red or blue.
The graphics state persists even after Render finishes execution, so it's good practice to reset it before the function returns.
Speaking of good practice, it's a good idea to separate classes into their own files. So let's do just that. Currently, this is the contents of our init.hsl file:
We'll be moving the class's code into its own file, leaving init.hsl to only deal with spawning the entity. In Scripts, create a file named Chick.hsl, and move the definition of the Chick class into it. If done correctly, your scripts should be laid out like this:
Chick.hsl:
init.hsl:
Press F1. Since you just refactored the code, it should work like it did before. Also, Hatch still loaded our Chick class, without you needing to "import" it. This is because the engine automatically loads any class passed to Instance.Create. Additionally, if you have been paying attention to the Resources/Objects/ directory, you'll see that a new .ibc file was created:
Like previously mentioned, Hatch will compile code for new script files you create, without you having to tell it to do so.
By default, Hatch will load an empty scene, but you can specify a scene file. The engine can read Tiled's map format (TMX) and supports a decent amount of features. Download the following files and move them into the Resources directory:
scene.tmx
tileset.png
background.png
The scene.tmx file is the scene file we'll be loading. It's pretty simple; it has only two layers, and one object, the chick. The tileset images are the files tileset.png and background.png. Hatch supports loading external Tiled tileset files (TSX) if specified by the map, but scene.tmx stores its tileset internally. To make Hatch load scene.tmx when it opens, add this line to GameConfig.xml:
Since scene.tmx has an instance of the Chick object, your script doesn't need to create one anymore. Go back to init.hsl, and remove the call to Instance.Create:
Press F1, and you should see this:
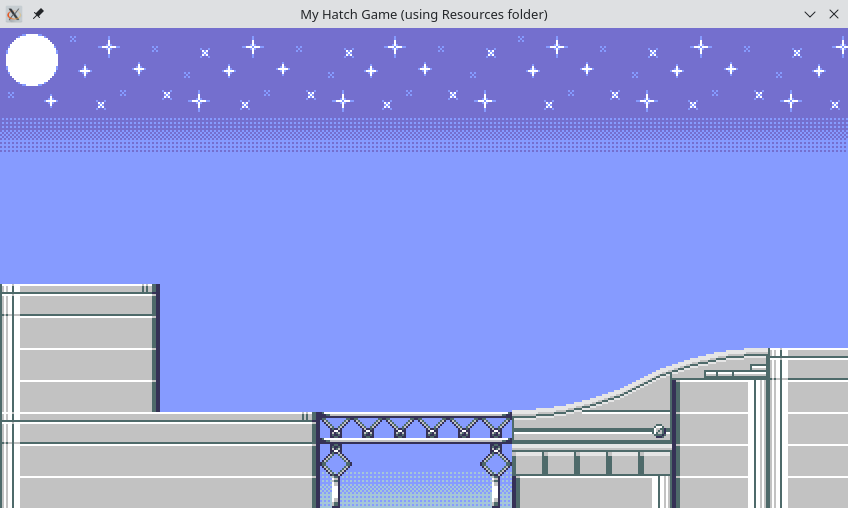
The tiles are being displayed, but the chick isn't visible. Why?
In Hatch, layers and entities are displayed using a priority system. Layers render on top of entities, and an entity/layer with a higher priority than another entity/layer is displayed on top of it. By default, all layers and entities have a priority of zero, so the chick is being rendered behind the layers.
Of course, you can change the priority of any layer or entity through a script. For entities, you can change their Entity.Priority field. Create is a good place for this:
The chick should be visible again.
Entities spawned through scene files have properties that can be read from a script. The method Entity.PropertyExists checks if a given named property has been set on an entity, and Entity.PropertyGet gets the value of the property. Hatch supports the following property types when loading a Tiled map:
| Tiled type | HSL type |
|---|---|
| int | Integer |
| float | Decimal |
| bool | Integer |
| color | Integer |
| file | String |
| object | Integer |
| Any other types | String |
In the scene file you downloaded, the Chick object has a blendColor property, which is of the color type. Since properties of type color become integers, we can pass it directly to Draw.SetBlendColor. Let's hook this up to the current code we have.
In our Create method, replace these lines:
...with this code:
In Update, remove these lines:
And in Render, replace this line:
...with this line:
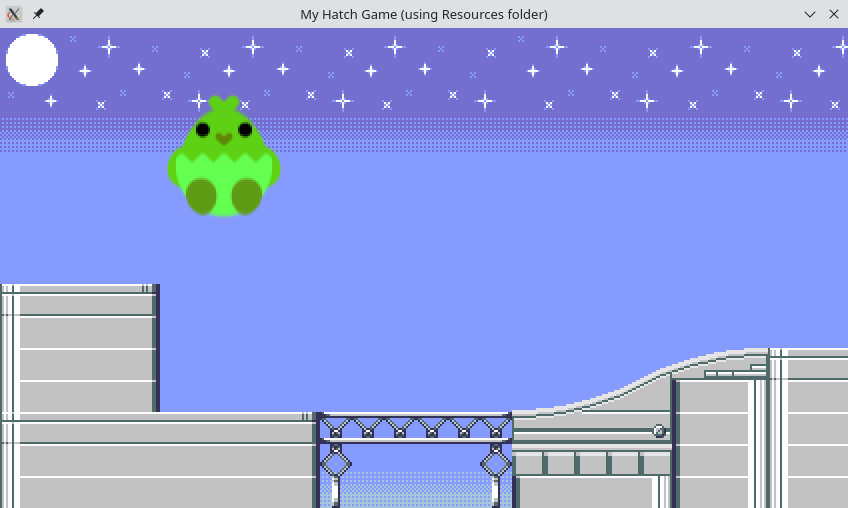
Press F1. The chick should look like this:
You can try changing blendColor by opening the scene file in Tiled, or by directly editing scene.tmx in your source code editor, since TMX files are XML documents. You may also experiment adding more properties of different types to the Chick object.
Most games need to perform some sort of basic physics simulations, even if it's just for visuals. Entity has fields called Entity.SpeedX, Entity.SpeedY, and Entity.GravitySpeed, which we will use to accomplish basic platformer physics. Eevery frame the Chick will add its gravity value to its vertical speed, and add Entity.SpeedX and Entity.SpeedY to Entity.X and Entity.Y. Hatch performs this automatically if Entity.AutoPhysics is set to true, or if Entity.ApplyMotion is called every frame, but writing your own code always allows you to be more flexible.
By default, Entity.GravitySpeed is 0.0, so we need to set it to some value. At the end of Create, add this line:
And change the entirety of Update:
This is a basic implementation of acceleration and deceleration physics. Most platformers do something similar.
When you recompile your code, however, the Chick completely falls through the floor:
We are missing tile collision detection code, so let's write it. Before we do anything, though, we need to make the scene load tile collision data for the tileset, using Scene.LoadTileCollisions. Download the following file and move it into the Resources directory:
And in init.hsl, add this code:
This loads tile collision data that matches our scene's tileset, and disables collision on the background layer. We can now write our tile collision detection code.
The best way to do this is by using TileCollision.Line. Add this code to Update:
Press F1. The Chick now properly collides with the floor:
One more thing we can add is a jump button: we check if Entity.SpeedY is zero, and if the A input is being pressed.
Press F1. Now you can move the Chick around like in a platformer game:
This concludes the tutorial! You were introduced to instances and entities, the differences between them, how Hatch connects the engine-side fields and methods of an entity to the code you write, as well as how to draw elements to the screen, poll inputs, load a scene file, and perform basic collision detection.
The tutorial isn't comprehensive in terms of features. You are encouraged to read the Manual to further understand what Hatch can do for you.